Audio demo of the Stupid Box
So, this last build was the most frustrating so far. Â On the breadboard, I debated whether or not to even transfer it to perfboard and find an enclosure. Â But, as it is the first synth I built from the ground up for use with my sequencer, I figured I should go ahead and complete it.
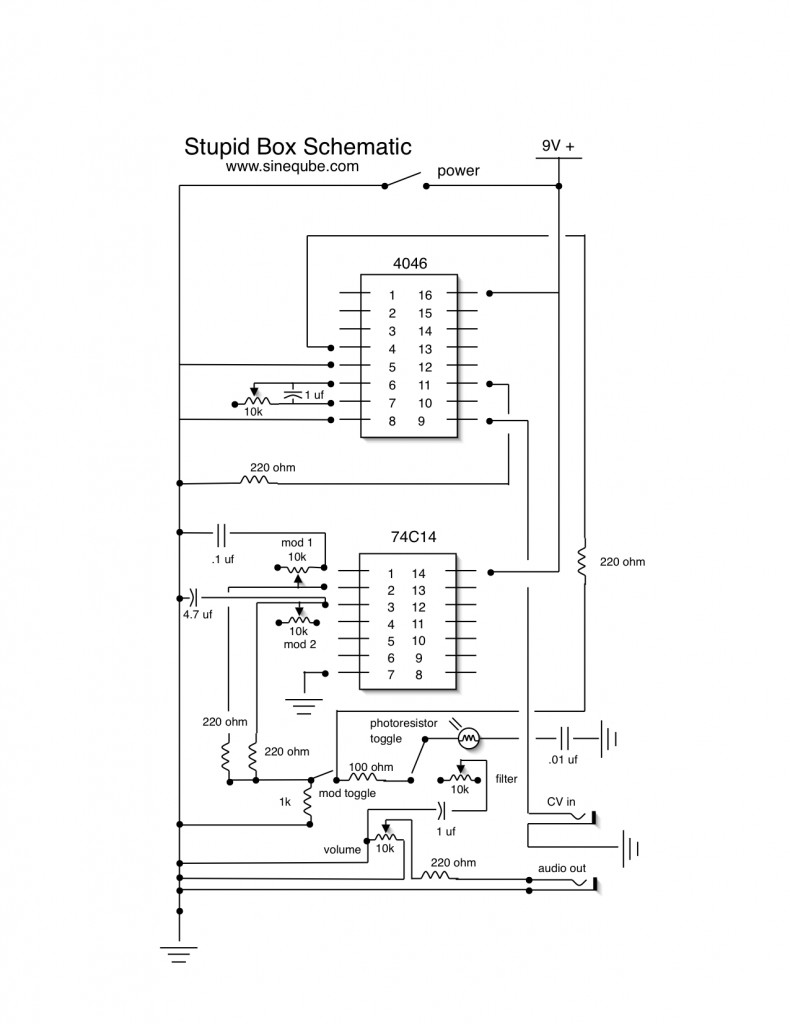
The synth itself is comprised of two chips, the 4046 and the 74C14. Â The former serves as a basic square wave oscillator triggered from the CV out of the step sequencer, and the latter adds a couple more squares to modulate the first oscillator. Â On the breadboard, it made some mildly interesting sounds, was pretty noisy, and I felt “meh” about it, overall. Â I wanted to get it done fast so I could move onto the next thing. Â I don’t like lingering on one project for too long.
I’m usually very meticulous and methodical about moving from the prototype to finalizing the build, triple checking every connection before soldering the components. Â I even take multiple photographs from different angles of the breadboard, in case I get into trouble later. Â This time, I also shot a little video, panning around the breadboard to make sure I could recheck working connections if something went wrong after soldering.
And tons of stuff went wrong.
I’m really not into 2nd drafts. Â I want to do things right the first time, so I work slowly and try to make the end result as good as possible because I get extremely bored going over old material. Â I’m the same way with music, writing, visual arts, nearly every creative endeavor — if I can’t do it quickly, I move onto something else as I have more ideas than time to complete them all. Â This project, which I affectionately dubbed, “Stupid Box,” would test my patience in this regard.
Everything worked fine during prototyping, but that limbo between breadboard and final build where the project isn’t functional is incredibly stressful for me. Â There exists that time where it doesn’t work, and you hope it can work again, assuming you build correctly. Â I worked slowly, checked everything a bajillion times, and flipped on the power …
Nothing.
Strike that. Â The battery started getting hot. Â Not good. Â Not good. Â Polarity must be reversed on the clip. Â Tried rewiring. Â No joy. Â Still getting hot. Â Checked the direction of the electrolytics (even though I quadruple-checked as I built). Â Everything looks good. Â Checked the diode direction. Â Looked fine.
I’m stumped. Â And very frustrated. Â I didn’t like this thing much to begin with, and now I started hating it. Â I had a choice — keep trying to troubleshoot for a project my heart wasn’t in, or try and salvage the parts I could and move onto something else. Â I had spent about a week off and on working on this though, and I hate failing. Â I had to beat this Stupid Box, or I knew it would eat at me.
The hardest part about troubleshooting things like this is that it is usually some very small thing that’s simple to change, but it’s hidden. Â From about a decade of working with Max/MSP, I was very familiar with this scenario. Â I still hate it, but I’m familiar with it. Â These problems tend to plague me for days on end and I have trouble focusing on anything else until it’s solved.
I scanned the perfboard for anything obvious. Â I plugged the sequencer into the unit but kept the synth itself unpowered. Â I could hear the clicking as the few volts the sequencer sent out coursed through the board and into the little battery-powered amp. Â I poked and prodded every connection to check continuity, and see if I could inadvertently trigger something good to happen. Â I was as much hoping for magic as science as my frustration grew.
Click click click click. Â The four pulses from the sequencer didn’t change, and every time I plugged the battery in, it still got warm. Â It was hard to check the issue when I couldn’t even get voltage into the system.
There!
Was that a little fleck of solder between the power and ground lines? Â It was so small, that even with a magnifying glass, I had trouble telling if there was a connection. Â I called my wife to come be another set of eyes. Â Still too small to tell. Â I fired up the iron and melted the solder enough to take a small knife and insure the separation of points.
Battery in. Â LED on. Â Success!
The project I was only mildly interested in was functional. Â Yay. Â : /
Other stuff went wrong too. Â Things were shorting against the enclosure so I could only screw the circuit halfway. Â The modulation section stopped working completely and after replacing two capacitors, a diode, and rewiring a solder joint that came loose, it ended up being one of the screws securing the board in place was shorting out a wire that was too close. Â The mod section itself sounded way too faint in contrast to the output of the main oscillator. Â When the photoresistor was engaged the filter pot acted in reverse. Â And on and on and on.
So, this project has become an exercise in letting go. Â It is yet another instance where I have to teach myself not to obsess over controlling every system I create. Â As much as I have a deep love for generative work and aleatoric processes, I still default to wanting to be the puppet master. Â Perhaps it’s because of this personality trait that I find generative systems so very Zen in my life. Â It’s easy to be a Taoist when things are running smooth. Â I need to carry it with me into the chaos.
I’m glad I built my Stupid Box. Â It makes some decent sounds, especially after replacing the diode (see below). Â I was even able to coax some vaguely formant synthesis sounding material out of it. Â Time will tell how useful it is in the long run, but for now, I am pleased. Â Here’s the mp3 demo again in case you missed it at the top:
Audio demo of the Stupid Box
• • •
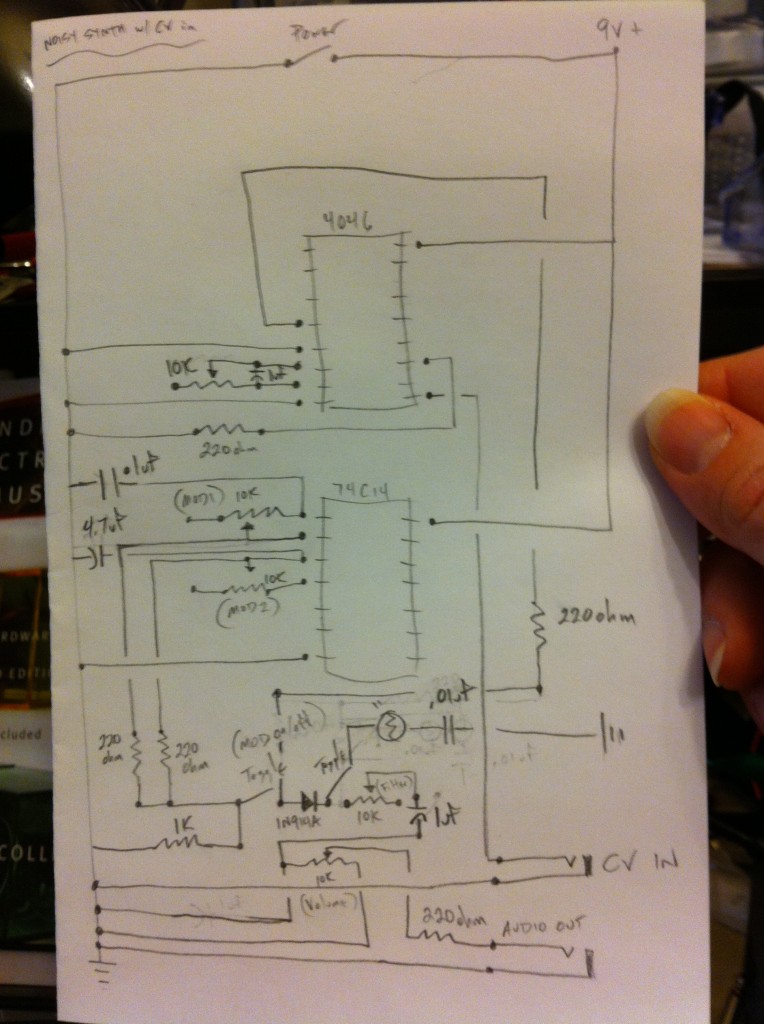
I’m including the hand-drawn schematic in case anyone wants to play around with this monster. Â Yes, I know I need to digitize the layouts, but a crappy hand-drawn one is better than none, perhaps?
*Oh, I recommend replacing the diode with a 100 ohm resistor instead. Â The mod section ended up sounding much more effective as a result.


Update 1.24.2011
Using an old version of Omni Graffle, I was able to put together a cleaner looking schematic. Â Hope this is a bit more helpful to anyone looking to build one of these.

Comments are closed.